


|
updated: 01 Nov 2005
The Rhodes Piano
Pretty early on in my search for cool keyboard, I hit upon an instrument which was great value, and was a blast to play.
This instrument, of course, is the venerable Rhodes piano. At the time I has basically
no money, but I wanted something with a little bit of soul. The Rhodes has big hairly
gobs of soul. Mine was a funky old Rhodes Stage 73 piano. I bought it out of
 the paper and I think I paid $150 for it. It turned out to be a great choice. They're heavy,
but they're cheap and plentiful, and it's a very responsive, fun instrument to play. They
seem to be back in vogue, but even still I see them in the paper for $200-$400. I played mine
through a Sunn bass amp, and it sounded really great the two or three times I was able to
play it through a friend's Fender Twin.
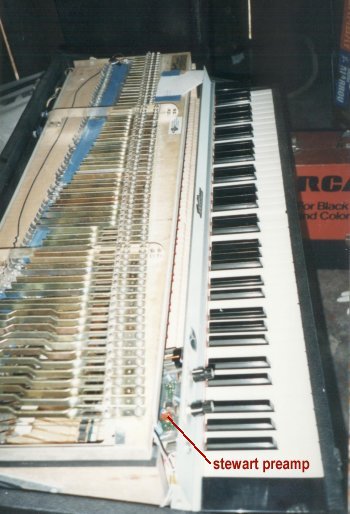
A few years later I was short on cash and ended up selling my Rhodes, but about eight years ago
I bought another one just like it. I also managed to find an old Stewart pre-amp, which is a little
op-amp board powered by a 9v battery. It boosts the signal and gives you some EQ control. Stewart
Electronics is now a big, proper, company, with a big, proper product line. I talked to one of
the founders of the company at NAMM many years ago, and asked him about the Rhodes piano preamp.
He gave kind of a boy-those-were-the-days chuckle, and said that the Rhodes preamp was their
very first product. This humble little device gives the Rhodes an amazingly clear bell-like sound
if you want, or it can get all burly and fat.
the paper and I think I paid $150 for it. It turned out to be a great choice. They're heavy,
but they're cheap and plentiful, and it's a very responsive, fun instrument to play. They
seem to be back in vogue, but even still I see them in the paper for $200-$400. I played mine
through a Sunn bass amp, and it sounded really great the two or three times I was able to
play it through a friend's Fender Twin.
A few years later I was short on cash and ended up selling my Rhodes, but about eight years ago
I bought another one just like it. I also managed to find an old Stewart pre-amp, which is a little
op-amp board powered by a 9v battery. It boosts the signal and gives you some EQ control. Stewart
Electronics is now a big, proper, company, with a big, proper product line. I talked to one of
the founders of the company at NAMM many years ago, and asked him about the Rhodes piano preamp.
He gave kind of a boy-those-were-the-days chuckle, and said that the Rhodes preamp was their
very first product. This humble little device gives the Rhodes an amazingly clear bell-like sound
if you want, or it can get all burly and fat.
My Rhodes is set up in the studio, next to the Hammond, and I've been playing it through a Mesa Boogie
Mark I. A Rhodes really wants to be played through a good tube amp, but
let's be honest, what doesn't sound good through a good tube amp? Yeah, I thought so. I'm also
using the Rhodes MIDI output to trigger my GEM RealPiano module and a clav sample.
MIDI for the Rhodes
Yes, you can add MIDI to your Rhodes. Many years ago, from about 1990-1995, I wrote
embedded software for Gulbransen. Among other things, Gulbransen made retrofit MIDI controllers
for acoustic pianos. Over the years, pieces of Gulbransen have been sold off to various different
companies, but very recently (as of April 2003) there are some interesting new developments with the
MIDI strip business; namely that the inventor of the optical MIDI strip has bought that business
from Gulbransen. The new company is called
Midi9 because the old Gulbransen SysEx ID was 9 (number
nine, number nine, number nine...)
It seems their first official act was to lower the price of the MIDI products. In particular, the
lowest price product (KS-1) now supports the 61 and 73 note strip, great news for Rhodes 73 owners.
(Previously, if you were looking to MIDI 73 keys, you had to pay top whack for the top-of-the-line
KS-20 controller).
Anyway, although the sensor strip was originally designed for acoustic pianos, with a little bit of elbow grease and ingenuity you can also put one of these
MIDI strips in a Rhodes piano, Yamaha CP-70/80, and a variety of other instruments. (Unfortunately
the Hammond organ is not one of those instruments. The keycomb structure makes it very difficult
to install this type of sensor strip. I am told it's been done, but I've never seen the installation.
I imagine that it took a lot of work.)
But I digress. If you're considering
putting MIDI in your Rhodes, here what you need to know:
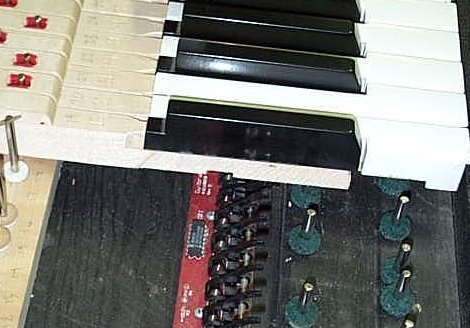
You need a MIDI strip The Gulbransen/Midi9 sensor strip is pretty much the only game in town. (I haven't
worked for Gulbransen for years, so I have no vested interest in telling you this.) It's the
one all the pros use, and it's the easiest to install. With the Gulbransen system, you get a sensor strip
which fits below the piano keyboard. There are 88 little loch-ness-monster-shaped fingers (called Nessies)
which gently ride on the bottom of the key, following it through its motion. They exert almost no force at
all, can't even tell it's there. There's also a control unit which houses the microprocessor which
scans the keyboard, detects key motion, decides when to generate MIDI events, calculates note velocity,
aftertouch, etc, and some of the control units have a sound module
as well. The sensor strip used to only come in one length, 88 notes,
At some point the company decided to offer a 61-note strip for use in pipe organs. My boss Dr. Bob
and I both had Rhodes pianos, and somehow we convinced the president that the product line really needed a 73 note strip as well.
Much to our surprise, we won that battle, hooray!
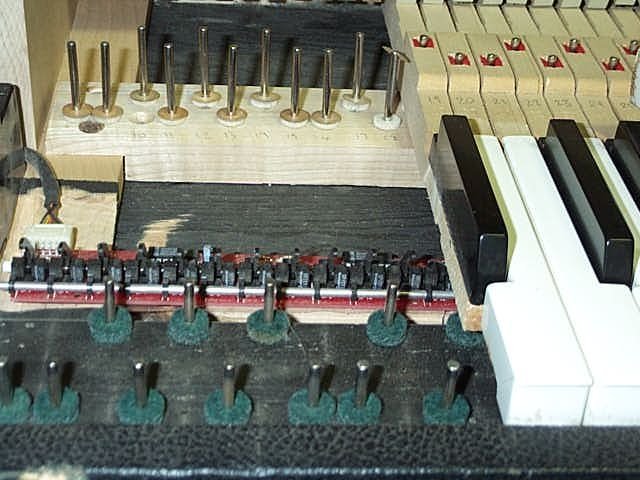
You need to install the strip The sensor strip is shipped mounted to a long, flat, metal plate. The strip and plate will
fit below the keys of most acoustic pianos, but not the Rhodes. The keys will bottom out on (physically strike) the top of the
sensor strip, which is not good, so you have two options: use a router to cut a 1/8" deep groove in the
bottom of the Rhodes case (preferred method), or remove the strip from the plate and mount it directly to the wood
(the expedient method, which is what I did). Either way will achieve the goal of creating the necessary clearance
underneath the keys. If you go the quick route, note that there is a thin, clear, plastic insulating strip that normally
goes between the sensor strip circuit board, and the flat mounting plate. When you remove the sensor strip from the plate,
you'll want to re-use the clear plastic insulator so that the circuit board (which has traces on it) doesn't come into
contact with the wood of the Rhodes piano. That way any moisture in the wood won't cause any conduction problems
with the sensor strip.
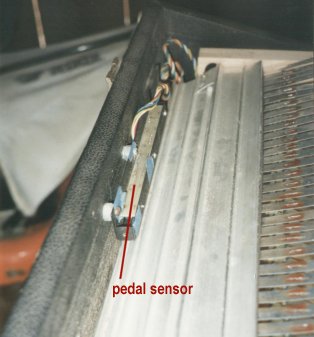
Something else to keep in mind: I think these days most of the products are shipped with a magnetic sustain pedal
sensor. This may work fine for acoustic pianos, but you should seriously consider paying extra for the optional
Nessie-based SS-5 pedal sensor. It's a lot easier to mount the SS-5 robustly in
a Rhodes. This sensor actually has three Nessies (for Soft, Sostenuto, and Sustain). I taped two of them out
of the way (doesn't matter which ones, the software figures it all out) and mounted the sensor to the Rhodes case
in such a way that the sustain plate pushes up against the remaining Nessie when you press the sustain pedal. The
exact alignment isn't very critical. You just need to mount it so the sustain plate doesn't strike the sensor
housing.
The Gulbransen/Midi9 products all use a software calibration to set key travel. You put the control unit into a
special mode, and you play every key and the sustain pedal. Then you exit from the mode, the up and down positions
are all stored in non-volatile memory.
That's pretty much it for installation weirdnesses, everything else is fairly straightforward and is
covered in some detail in the Gulbransen installation manual (a lot of which I wrote, by the way!) You can
find the installation manual on the Midi9 site under the "support" link.

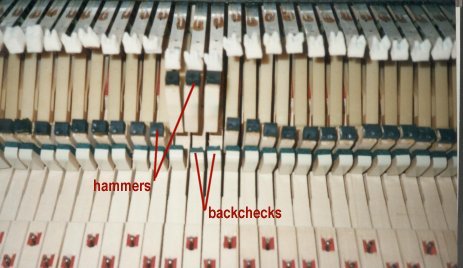
You need backchecks. The action on a Rhodes is, well, funky. One of the places Harold Rhodes
saved money was in in the escapement mechanism. If you take apart your Rhodes (something every Rhodes owner
should do), you will see that when you press down on a key, it basically yanks on a weird little strap which
causes the hammer to fly up and hit the tine. The problem is that when the hammer falls back down, it yanks on
the strap and causes the key to bounce. This isn't much of an issue until you install a sensor strip. The sensor strip
uses key motion to detect MIDI events. Having the key bouncing all over the place isn't good. It confuses the control
unit and can cause false note triggers. The good news is that backchecks are not all that expensive and are not hard to
install, just a little time-consuming. Also, the addition of backchecks will go a long way towards cleaning up any sloppiness
the action of your Rhodes might
have. I bought mine from a piano repair supply house; sorry it's been so long I've lost the address. They shouldn't be
hard to find. Buy ordinary upright piano backchecks. If given a choice for stem length, go with the longer stems.
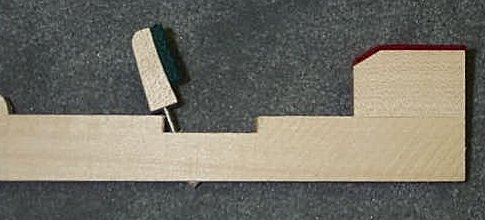
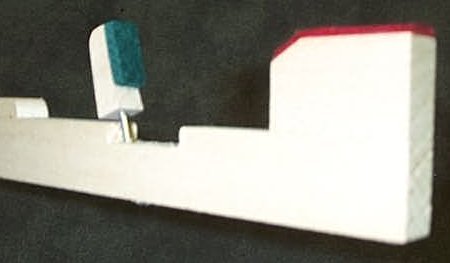
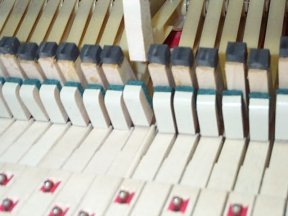
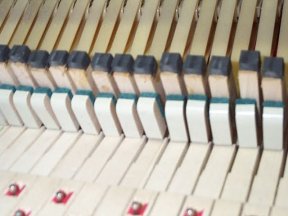
Hopefully the photos and diagram are clear enough. You basically want to mount the backcheck in a location so that
when the key is at rest, the backcheck felt rests against the back of the hammer. A drillpress is nice to have,
but I made a simple jig to hold the keystick, and I drilled mine by hand using a cordless drill. The backcheck
should be positioned in such a way that it supplies enough pressure (friction, really) to catch
the hammer after it strikes the tine, but not so much pressure as to make the note harder to play. The exact drilling location
isn't super critical because you can easily bend the backcheck stem to adjust the tension.
And that's my rap on the Rhodes piano.
COPYRIGHT © 1996-2005 David Chesavage All Rights Reserved |